Activity Goal:
Part 0: Setting Up
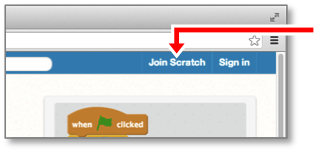
- Go to: http://scratch.mit.edu .
- Click on “Join Scratch”.
- Follow the instructions to create a new Scratch Account.
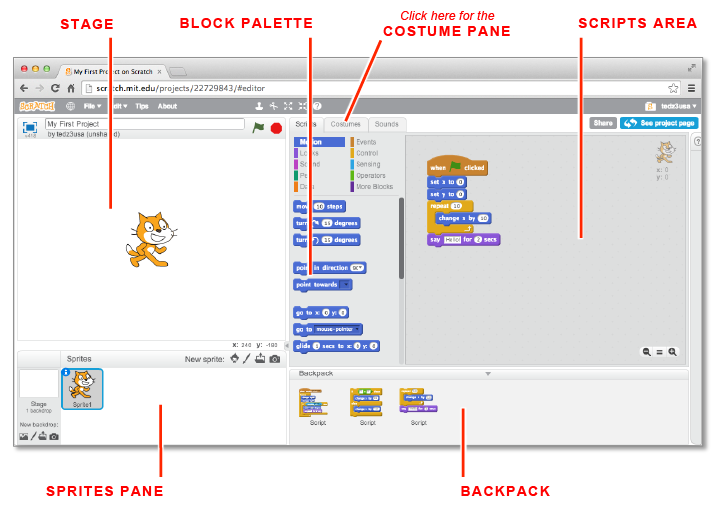
The rest of the document will make references to different parts of the interface. Come back here when you don’t know where in the interface the instructions are referring to.
Part 1: Introduction to Motion
-
Drag the following instruction into the empty scripts area.
change x by (10)
-
Click on this instruction and see what happens.
Now, click on this instruction several times to see what happens. -
Change the value inside the instruction from 10 to −10, and see what happens when you run the instruction.
Thechange x by (...)andchange y by (...)instructions allow you to change the x and y coordinates of the sprite by a specified amount. The change gets updated on the stage immediately after the instruction is run.
-
Drag the following instructions into the scripts area.
You will have to go to the “Control” section of the block palette to access the repeat block.
repeat (10) change x by (10) end -
Click on this set of instructions to see what happens when it gets run.
The repeat block can wrap around any set of instructions and repeatedly runs them the specified number of times. In this case, the instructionchange x by (10)is repeated 10 times, giving the appearance of the sprite moving across the screen to the right.
You can try changing the values inside therepeat (...) endandchange x by (...)instructions to see how they get affected when run.
Part 2: Beginning the Flappy Bird Project
Yes, “Faby” is the official name of the bird of the Flappy Bird game, according to the original game developer, Dong Nguyen. (Twitter)
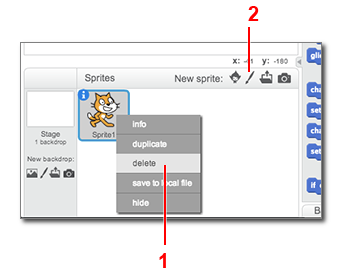
- Delete Sprite1 from the project by right-clicking on Sprite1 in the sprites pane and choosing “delete.” This will remove the Scratch Cat sprite from your project.
-
Create a new, blank sprite by clicking on the paint brush icon (
 ) in the sprites pane.
You have now created a new blank sprite, which will become the Faby bird sprite. -
The costume pane should automatically open.
- Download the image files from this zip file, and extract all the files to a folder on your computer.
-
Upload the 6 costumes for the new sprite by clicking on the file upload icon (
 ) in the costume pane.
Sometimes uploading multiple files at the same time can be buggy. Please make sure all 6 of the following costumes got successfully uploaded:- BlueDown
- BlueUp
- RedDown
- RedUp
- YellowDown
- YellowUp
- Select a costume you want to use for Faby.
-
Rename the sprite by clicking on the blue
 icon for the sprite in the sprites pane. Then type in “Faby” for the sprite name.
You have now created a Faby sprite that is ready to go!
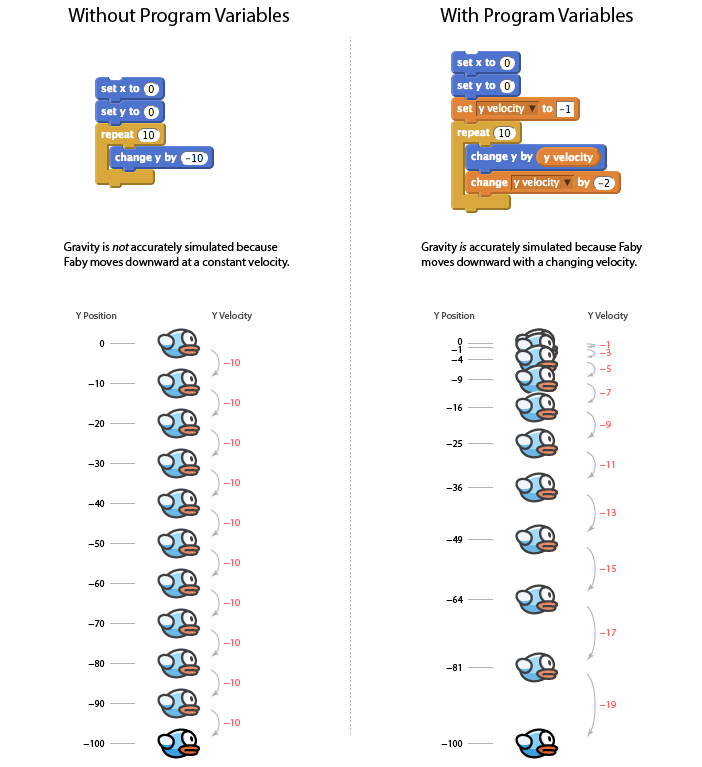
We learned in Part 1: Introduction to Motion, that we can use the following commands to make a sprite change its position on the screen: change x by (...) and change y by (...). Because gravity influences objects to move in a downwards direction, we will use the latter of the two commands, change y by (...), to control Faby vertically.
In order to simulate gravity, we must store the y-velocity in the following program variable: (y velocity).
Program variables are values in programs that may change over time. Some program variables are built into Scratch like (x position) and (y position), and others we will create ourselves like (y velocity).
Without program variables, we would only be able to make a sprite move downwards with constant velocty. To accurately simulate gravity, we need the downward velocity to change over time as well. See the following diagram:
-
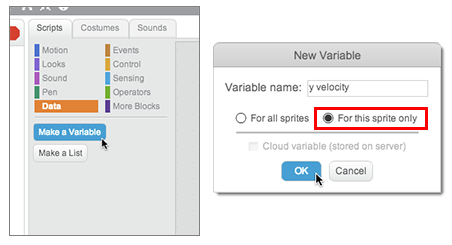
Create a new program variable called “y velocity.”
- Go to the “Data” section of block palette.
- Choose “Make a variable.”
- Type in “y velocity” for the variable name.
- Choose “For this sprite only” under the variable name.
-
Click OK.
You now have access to the variable and two commands for manipulating its value:(y velocity)set [y velocity v] to [...]change [y velocity v] by (...)
-
								forever
									change y by (y velocity)
									change [y velocity v] by (-1.2)
									if <(y position) < [-179]> then
										set [y velocity v] to [0]
										set y to (-180)
									end
								end
Drag the following instruction set into the scripts area and click on it to run the code block. Immediately you will see Faby fall to the ground.
Try dragging and dropping Faby in different areas of the stage to see gravity act on him.
Note: You will need to search around the block palette to make all of the instructions in this code block.
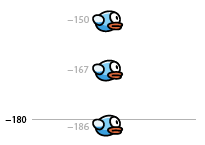
Y = −180 is the vertical lower bound for the stage. We use an IF statement to test if the y-position of the sprite has gone below −179.
If the sprite has gone below −179, Faby has “hit” the ground, and therefore his y velocity should be set to zero, and to maintain consistency everytime he hits the ground, we set his y position to −180.
An event is something that occurs that a program can detect and respond to during its runtime. Event related commands can be found in the events section of the block palette, and from there we will make use of three main event instructions:
when green flag clicked
when [space v] key pressed
when I receive [message1 v]
Let's see how we'll use one event instruction to allow us to make Faby respond to the user and jump.
-
Drag the following instruction set into the scripts area.
								when [space v] key pressed
								set [y velocity v] to [12]
-
Try pressing the space bar to see if Faby responds and jumps.
Note: If you do not see Faby jump, make sure that the code block from the previous module has been clicked and is running.
Part 3: More Game Logic
If you remember Module 4: Bring “Faby” the Flappy Bird into the World, we uploaded 6 costumes that Faby could display throughout the game:

We will use the switch costume to [... v] command to switch back and forth between costumes.
- Drag out a few of the following switch costume commands into the scripts area for your own testing demonstration purposes:
								switch costume to [BlueDown v]

								switch costume to [BlueUp v]

								switch costume to [YellowDown v]

								switch costume to [YellowUp v]

								switch costume to [RedDown v]

								switch costume to [RedUp v]
- Try clicking them to see how they change Faby's appearance.
We want to be able to change Faby's costume in a more dynamic manner, this will give us more flexibility to achieve effects like Faby's flapping.
First, we will use two variables to store the two states of Faby: his (color) and (wing direction).
- Make a new variable called "color":
(color)
Be sure to remember to choose "For this sprite only".
If you don't rememer how to make a variable, we introduced variables in Module 5: Add Gravity to Faby the Bird - Make another variable called "wing direction":
(wing direction)
(Again, be sure to remember to choose "For this sprite only".) -
Set initial values to these variables:
- Drag out the following instruction group.
-
Click on the instruction group to set initial values to these two variables.
You should see on the stage a display of the current values of your variables. The color and wing direction variables should be initialized as shown below: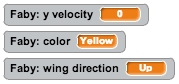
Note: You can hide these displays by unchecking the checkbox next to the variables listed in the Data section of the block palette.
Eventually, as we add more variables to the project you will want to hide all of the value displays from the stage as to not clutter everything.
									set [color v] to [Yellow]
									set [wing direction v] to [Up]
-
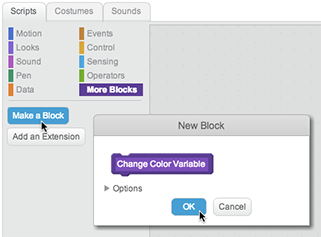
Make a new block function:
- Go to the More Blocks section of the block palette, and
- Choose: "Make a Block"
- Name the block Change Color Variable.
- Click OK.
-
Drag out the following instruction group into the new block definition:
								define Change Color Variable
								if <(color) = [Yellow]> then
										set [color v] to [Red]
								else
										if <(color) = [Red]> then
												set [color v] to [Blue]
										else
												set [color v] to [Yellow]
										end
								end
Click on the instruction group and observe the variable value of "color" change from "Yellow" to "Red" to "Blue" and then back to "Yellow":
Think about how the logic in the code works out to make the color variable value change in this sequence. -
Make another new block function called Change Wing Direction Variable with the following sub-instructions:
								define Change Wing Direction Variable
								if <(wing direction) = [Up]> then
										set [wing direction v] to [Down]
								else
										set [wing direction v] to [Up]
								end
Click on the instruction group and observe the variable value of "wing direction" change from "Up" to "Down" and then to "Up" again:
Think about how the logic in the code works to make this happen. -
Drag out the following instruction set to make use of the two user-defined instructions,
Change Color VariableandChange Wing Direction Variablethat you just created:forever Change Color Variable repeat (6) Change Wing Direction Variable switch costume to (join (color) (wing direction)) wait (0.3) secs end end
Click on this instruction set to see Faby flap his wings and change his color.Explanatory Note:Using the JOIN Statement to Switch Costumes(color)(wing direction)(join (color) (wing direction))Yellow Up YellowUp Yellow Down YellowDown Red Up RedUp Red Down RedDown Blue Up BlueUp Blue Down BlueDown The Join statement attaches two text values together to form a new text value. In this case, if the value of
(color)is “Yellow”, and the value of(wing direction)is “Up”, then the code expression(join (color) (wing direction))evaluates to the text "YellowUp", which is the exact name of one of the costumes for the sprite.
Part 4: Adding Other Game Elements
As we begin to add broader game flow logic, we don't want this logic to be soley handled by the Faby sprite. We want this logic to be handed by a dedicated, invisible sprite that we'll call “Controller”.
- Create a new sprite with the Paint new sprite
 button.
 - Rename the sprite to “Controller”
- Draw a single black dot in the center of the costume editor.
- Create the variable
(Game Mode)as a Global Variable by choosing the For all sprites option in the New Variable dialog. This makes the variable available for all sprites in the game to read and change its value. -
Add the following instruction sets into the scripts area for the Controller sprite:
								when green flag clicked
								broadcast [Initialize Variables v]
								broadcast [Reset Stage v]


								when I receive [Initialize Variables v]
								set [ghost v] effect to (100)
								set y to (0)
								set x to (0)
								hide


								when I receive [Reset Stage v]
								set [Game Mode v] to [Pre-Game]
								say [Press Space to Begin]
								show
								when [space v] key pressed
								if <(Game Mode) = [Pre-Game]> then
										set [Game Mode v] to [In-Game]
										broadcast [Begin Game v]
								end


								when I receive [Begin Game v]
								hide


								when I receive [Faby Died v]
								broadcast [Reset Stage v]
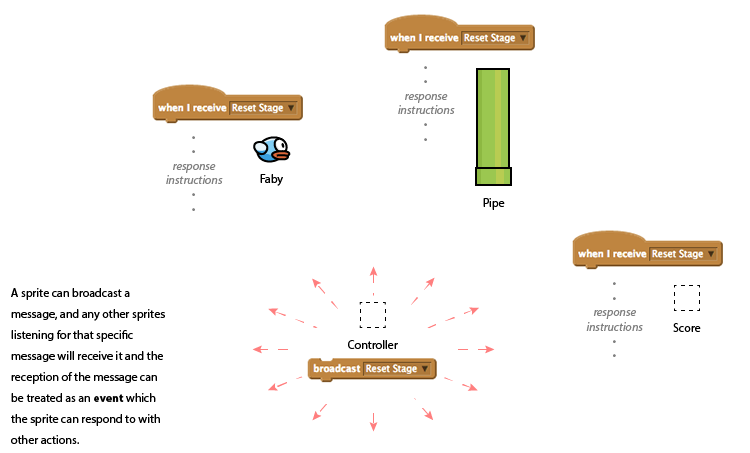
So far, we have run instructions for Faby by clicking on instruction groups in the scripts area. Now, we want Faby to respond to Game Logic messages like “Reset Stage” and “Begin Game”
-
Create the variables
(pre-game velocity)and(wing timer)as local variables, by choosing “For this sprite only” in the New Variable dialog box. Make sure you are doing this inside of the Faby sprite.
As the stage clutters up with variable value displays, remember that you can turn off these value displays by unchecking the checkbox next to the variables in their listing on the Data section of the block palette. -
Add the following instructions to the scripts area for Faby:
									when I receive [Initialize Variables v]
									set [color v] to [Yellow]
									set [wing direction v] to [Up]
									set [y velocity v] to [0]
									set [wing timer v] to [0]
									set x to (-50)


									when I receive [Reset Stage v]
									set [pre-game velocity v] to [1]
									set y to (0)
									forever
											Check Faby Position
											Check Faby Wing Flap
											Check Faby Touching Pipe or Ground
									end


									when [space v] key pressed
									set [y velocity v] to [12]


									define Check Faby Position
									if <(Game Mode) = [Pre-Game]> then
											change y by (pre-game velocity)
											if <<(y position) < [-10]> or <(y position) > [10]>> then
													set [pre-game velocity v] to ((-1) * (pre-game velocity))
											end
									else
											change y by (y velocity)
											change [y velocity v] by (-1.2)
											if <(y position) < [-179]> then
													set [y velocity v] to [0]
													set y to (-180)
											end
									end


									define Check Faby Wing Flap
									change [wing timer v] by (1)
									if <(wing timer) > [7]> then
											Change Wing Direction Variable
											Update Faby Costume
											set [wing timer v] to [0]
									end
									define Change Wing Direction Variable
									if <(wing direction) = [Up]> then
											set [wing direction v] to [Down]
									else
											set [wing direction v] to [Up]
									end


									define Update Faby Costume
									switch costume to (join (color) (wing direction))


									define Check Faby Touching Pipe or Ground
									if <<touching [Pipe v]?> or <(y position) = [-180]>> then
											Change Color Variable
											Update Faby Costume
											broadcast [Faby Died v]
									end

									define Change Color Variable
									if <(color) = [Yellow]> then
											set [color v] to [Red]
									else
											if <(color) = [Red]> then
													set [color v] to [Blue]
											else
													set [color v] to [Yellow]
											end
									end
-
Create a new sprite with the Paint new sprite button.
- Rename the sprite to “Pipe”
- Upload two new costumes for the pipe sprite using the two images found in this zip file. Remember to extract/expand the zip archive on your computer before uploading them as a sprite costume.
-
Create the following local variables for the Pipe sprite making sure to choose “For this sprite only” in the New Variable dialog box for each variable:
(center bounds)(pending add score)(pipe gap)(pipe timer)(position)(y center) -
Add the following instruction sets to the Pipe sprite scripts area:
									when I receive [Initialize Variables v]
									set [position v] to [Above]
									set [pipe gap v] to [100]
									set [pipe timer v] to [0]
									set [y center v] to [80]
									set x to (300)


									when I receive [Reset Stage v]
									delete this clone


									when I start as a clone
									switch costume to (join [Pipe] (position))
									show
									forever
											change x by (-3.5)
											if <<(x position) < [-50]> and <(pending add score) = [True]>> then
													broadcast [Score Add One v]
													set [pending add score v] to [False]
											end
											if <(x position) < [-250]> then
													delete this clone
											end
									end
									when I receive [Begin Game v]
									hide
									set [pipe timer v] to [20]
									forever
											if <(Game Mode) = [In-Game]> then
													change [pipe timer v] by (1)
													if <(pipe timer) > [50]> then
															set [y center v] to (pick random ((-1) * (center bounds)) to (center bounds))
															set [position v] to [Above]
															set y to ((y center) + ((pipe gap) / (2)))
															set [pending add score v] to [True]
															create clone of [myself v]
															set [position v] to [Below]
															set y to ((y center) - ((pipe gap) / (2)))
															set [pending add score v] to [False]
															create clone of [myself v]
															set [pipe timer v] to [0]
													end
											end
									end
We will keep track of two values (Score) and (High Score), and we'll use another sprite to handle the logic of keeping track of score, we'll call this sprite “Score”.
- Make a new blank sprite and rename it to “Score”.
-
Create the two Global Variables
(Score)and(High Score), making sure to choose “For all sprites” so that all sprites can see these two variables. -
Add the following instruction sets to the scripts area for the Score sprite:
									when I receive [Initialize Variables v]
									set [High Score v] to [0]
									set [Score v] to [0]
									show variable [Score v]
									show variable [High Score v]


									when I receive [Reset Stage v]
									show variable [High Score v]
									if <(Score) > (High Score)> then
											set [High Score v] to (Score)
									end
									when I receive [Begin Game v]
									hide variable [High Score v]
									set [Score v] to [0]


									when I receive [Score Add One v]
									change [Score v] by (1)
The show and hide variable commands allow us to programmatically control whether the variable values are displayed on the screen or not. In this case, we want the high score to be hidden during normal game play as to not clutter the stage too much.
When you are finished coding the game, consider hiding all variable value displays from the stage so that only the score and high score variable values will show up.
You made it to the end!! Thanks for taking the time to go through this activity, I hope you learned some new things from this experience.