Setting Up Your Development Environment
The first thing we need to do before you can begin coding is set up your development environment. Your development environment will consist of three components:
| Code Editor | Where you write your code. | |
|---|---|---|
| Web Browser | Where you run your code. | |
| JavaScript Console | Where to find bugs easily. |
Please click on the link below to download a ZIP of a folder containing our initial files. Then, extract the files onto somewhere convenient like your Desktop, or Documents folder. These initial files will allow us to jump straight into coding in JavaScript.
Download Initial Files (asteroid_dodger.zip)Code Editor
With your code editor, open the file main.js. This is where we're going to put our JavaScript code. The initial files are setup so that main.js is run immediately. To begin, put the following line of code in the editor, then save the file:
Web Browser
To test if your code works, we're going to run it in a web browser. If Google Chrome is your default web browser, then you can just double-click on the file game.html. You may also drag the file over the Google Chrome icon.
If your code is correct, then an alert box should pop up with the text, "Hello World!", as shown below:
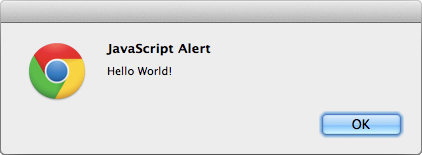
If not, make sure you've typed the line of code provided above exactly as it is shown. When you've correctly seen the alert window popup, you may proceed to the next section.
The JavaScript Console
Congratulations! You've typed your first line of code! Now, we need to setup a way to easily debug your code when things aren't working. For this project, we want to view the JavaScript Console.
- Go back to the Chrome window with game.html open.
- In the top-right corner of the browser, click the Chrome menu .
- Select More tools.
- Click JavaScript Console.
The JavaScript Console is going to be a window into the JavaScript world while your program is running. Let's see this in action.
Logging to the Console
Go back to your code editor with the file main.js open. Then, delete the line of code you had before, and replace it with these two lines of code:
The first line is a little complicated, but it's necessary for us to create a convenient log() function, which we can call anywhere in our code to send messages to the JavaScript console.
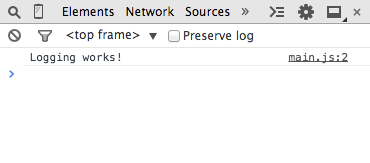
Now, go back to the game.html file open in Google Chrome, and refresh the page. If your JavaScript Console is open (see last section), you should see the text "Logging works!" outputted there.
If you do not see the text "Logging works!" outputted to the JavaScript console, click on the Debugging Tips link at the bottom of the window for some guidelines.
When you see that you have logging working, you may proceed to the next section.
Make Code Run After Window Has Loaded
So far, we have our main.js code running immediately. Unfortunately, this isn't good if we're trying to draw shapes on a web page where the canvas element hasn't been loaded yet. We need to have our code run after the window has been completely loaded.
Open up main.js in your code editor and add the following lines of code indicated in yellow:
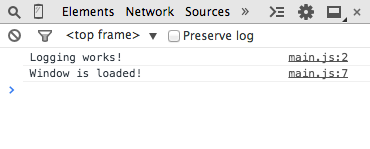
Now go back to the Google Chrome window with game.html and the JavaScript Console open, and refresh the page. If you typed the code correctly, you should see that the text Window is loaded! has been logged to the console.
If you have reached this point, then congratulations, you are now ready to draw on the canvas!
Debugging Tips
- All JavaScript code is case-sensitive. Make sure that every letter of your code matches the casing as seen in the instructions.
- Keep an eye out for all symbols such as parenthesis, periods, commas, quotations, and semicolons.
- The semicolon at the end of every JavaScript statement is the easiest symbol to forget.
Note about whitespace:
For the most part, JavaScript doesn't care about whitespace (spaces, tabs, and carriage returns). In fact, it's actually encouraged for you to use as many spaces, tabs, and carriage returns as necessary to make your code easy to read. For example:
Which is easier to read?